An Innovative Email Verification Technique for Spam

I use a burner (temporary) email for filling it at random websites for my testing. Still, I have taken care not to use this email address at unreliable websites.

Somehow, someone got hold of this email address. Now, how can that person check that my address is still valid and active? They need to check this for sending me spam/phishing emails and get a better ROI.

Here’s the technique they used, and I was impressed. Generally I don’t entertain my Spam folder and hence haven’t seen many of such mails. The mail says —

The subject starts with RE: so we think that this might be a reply to our action — Unsubscribe. Also, the subject contains my email address, so we can say that the spammer took efforts to somewhat personalize the mail for each receiver. Everything else is alright in the mail – looks like a valid mail for unsubscribing a service.

At the end, there is this link for unsubscribing from all the mailing lists. I need to click this link for happily unsubscribing. 🙂

Sure, I would do that. But first let me check what’s inside that link. I long press the link to see the full URL —

Errr. This URL is not an URL for unsubscribing from mailing lists. When I click on this, it prompts me to send a mail to all the spammers (their emails listed in screenshot), with mail-body as: “yes my email is lalalalala@gmail.com”.

This way, spammers can verify that my email address is valid and active (since I clicked on their mail). Good thing is, we directly get the list of spammers’ email address. This can be reported to online anti-spam services.

Why is this idea innovative? Many of us randomly subscribe to different mailing lists. After a year or so, we find that the emails are boring or not much relevant/informative. So we find a way to unsubscribe from these mails. And we surely welcome someone who sends us a link for unsubscribing the mails. So there are more chances of us to click on this link.

Why do spammers need to verify our mails? Spammers invest their time and money to compose the spam mails and later harvest some money from the victims. They use mailing services or own email servers for sending spam mails in bulk. If they randomly send 10000 mails and get only 10 replies, this is not much fruitful. Out of these 10000, there are chances that 30-40% of email addresses are inactive now (people stopped using them, typo addresses, forgot password, etc). So the spammers who want to get more replies would first verify whether the email addresses are active or not – because the more active addresses would bring more victims.

Learning from this story is, always check the contents of a hyperlink. Always.

Set-up Penetration Testing server on AWS

Amazon Web Services (AWS) is a great resource to try and learn cloud concepts and later setup your own infrastructure on cloud. Since very long, AWS is providing 1 year of free usage for a set of cloud services.

If you own one laptop and want to have another machine for testing, you either need to install Virtualization software (Virtual Box, VMWare, etc) or you can use the free tier of AWS. Amazon EC2 (Elastic Compute Cloud) can be used to setup your own instances on the cloud to do this. While having a penetration testing machine on AWS, you need to take care of some points:

  1. You can run penetration testing only on your own AWS resources
  2. The permitted resources/services which can be pen-tested without prior approval include EC2, CloudFront, RDS, etc. Refer here for a list of permitted and non-permitted services
  3. For any other scenarios or simulated events, you need to take prior permission from AWS for your activity. You can refer here for more details
  4. It also means that, you can test only the infra/services that you own, not the AWS services or AWS infrastructure — means if you are owning an Ubuntu EC2 instance, you can test only the resources hosted on that Ubuntu server

For this topic, we would setup a penetration testing server on AWS and later attack it using our own machine. We would install web server and other vulnerable components on the server so that we can practice our penetration testing skills. If required, this could also work as a honeypot for analyzing the attack patterns by different attackers.

What are the benefits of using an AWS instance for penetration testing?

  1. You can get a public IP for your testing
  2. If you wish to setup your machine as a honeypot, it can be easily done through this
  3. The internet connection would be much faster for the AWS instance
  4. Very easy deployment and termination of instances
  5. Lots of base OS available, including Ubuntu, Windows Server, Amazon Linux, Red Hat, SUSE

If you don’t have an account on AWS, you can create one and AWS would provide you some services for free for 1 year. There are limits to what services and what configurations can be chosen. For our current activity, we would be working with Amazon EC2. For EC2, there are some limitations for the Free-tier — you can only use 750 hours of instance per month, only 30GB of storage and limited instance types. But this would be sufficient for our testing scenario.

To create an EC2 Ubuntu instance on AWS, do the following:

  1. On the top bar, go to Services and click on EC2
  2. This would open the EC2 Dashboard as shown below
  3. To launch a new Instance, click Launch Instance
  4. You would be given a list of various AMI (Amazon Machine Image). The images eligible for free-tier would be marked accordingly. We would select Ubuntu Server 18.04 from the list
  5. Next step is to select the instance type. Here, since we are using the free-tier, we would select t2.micro which is eligible for free tier
  6. For the step to configure instance details, we can use the default values and move to next step for adding Storage. Free-tier allows max 30GB of storage, select any number below 30 here.
  7. Add any Tags if you want, on the next step. Tags are for identifying different instances. For example, you can tag all your production web servers as ‘prod-web’ and all the UAT web servers as ‘uat-web’.
  8. Security groups – this is an important configuration. This would work like a firewall and allow only the listed IP/ports. If you want to configure a HTTP/S web server, you can allow Port 80 and Port 443. For this case, you have to select Type as HTTP, Protocol as TCP, Port Range as 80, Source as Anywhere (this would allow all IPv4 and IPv6 ranges to access your machine with port 80). Do the same for port 443 and 22. We require SSH access of this machine, hence we are allowing port 22 also.
  9. We are now done with the launch configuration. Click on Review and Launch — it would launch the instance.
  10. When we click on Launch, it asks us to select or create a key-pair. This key pair is used to connect with our instance using SSH. Since this is the first time and we don’t have any keys, we select to create a new key pair. Name the key pair and download the key (that would be a .pem file). This key is most important for the security of your instance — never share this key with anyone or download it at a shared location.
Click on EC2
EC2 Dashboard
t2.micro instance
Security groups

For accessing the instance, you can go to Instances from the left menu and see your instance. You can connect with your instance by using (1) Standalone SSH client, e.g. putty or your Linux terminal, (2) Session Manager or (3) Browser based SSH connection. Here since I am using Linux machine, I would use the first option.

The command to connect with the instance is:

ssh -i "<key-file>.pem" ubuntu@<ip-address-of-your-instance>

Replace the name of key-file and the IP address of your instance. You can always get the ready-made command when you click on Connect button from the Instances dashboard. When you use this key for the first time, you also need to give the following command so that it can be viewed by SSH:

chmod 400 <key-file>.pem

Now the Ubuntu instance is ready! Connect to the instance and move around in the system.

Apache would be already installed in this image of Ubuntu. Start the Apache server and confirm it by putting the AWS instance’s public-IP in your browser.

We can now install different vulnerable applications. Note that these are intentionally vulnerable and hence will get breached by bots or attackers. Take proper care while connecting to your instance if you are opening up your instance with vulnerable applications. You would also need to open proper ports from Security Groups of your EC2 so that your machine can connect with the respective applications.

  1. DVWA: Download the source from their official Github and follow the installation instructions
  2. Webgoat: Download the latest release from their official Github and follow the installation instructions for Standalone version
  3. OWASP-Juice-shop: Grab the latest release from here and follow this installation guide for installing it on our Ubuntu instance

The Ubuntu instance is ready for testing! You can use your local machine (fire up Metasploit, Nmap, Burpsuite, whatever tools you find comfortable) to test the vulnerable applications. Just take care, not to attack any other instance or underlying AWS services without prior permissions.

Your Eureka Forbes account can easily be hacked!

I am a customer of Eureka Forbes, and last year I was accessing their website for making a payment. I own an Aquaguard Water Purifier by them and wanted to pay for the yearly maintenance contract (AMC).

For anything related to your account, you need to login via their website (https://www.eurekaforbes.com/). There is currently only 1 mechanism available for login – OTP Login. You provide your phone-number (registered with Eureka Forbes) and they send an SMS OTP to your phone.

There is a flaw in this mechanism. By using this flaw, anybody can login to anybody’s Eureka Forbes account — just by entering their phone number (needs to be linked with Eureka Forbes). As per Eureka Forbes, they have 20 Million customers – means I can literally enter phone-numbers sequentially and login to many accounts.

What’s the harm (or profit) in entering someone else’s account? By knowing/guessing a phone number, from their account I can view details like –

  • Full name
  • Email-id
  • Address (Home/Office/Business)
  • Order Details
  • AMC Details
  • Service Request Details
  • Download Invoices

Not just view, I can also edit the customers details. Just a scenario – I am out of my AMC duration, so I login to some account who has paid for the AMC, change their address to my address and later log a Service-Request to do the servicing (for free)! Another scenario is, fraudsters can harvest this data for selling.

Actions taken from my side:

As soon as I observed this flaw, I tried to inform Eureka Forbes regarding this issue. The initial point-of-contact (customer care – 18602661177) was useless – the Executive never connected me to someone technical. Next was to contact them over email – on Jan 17, I sent an email to deepa.customercare@eurekaforbes.com, customerservice@eurekaforbes.com (email-ids observed on their website) and shailendrakulkarni@eurekaforbes.com, suchetadadarkar@eurekaforbes.com (on LinkedIn, both have listed their jobs as IT Managers at Eureka Forbes). I did not get a reply. Found a Regional Head over LinkedIn and messaged her, but she didn’t reply.

Later I got information that Quinnox (www.quinnox.com) was the one who manages the IT and Websites for Eureka Forbes. Tried contacting one of their employee over LinkedIn, asking him to connect me with someone who can look into this — never got a reply.

My last option was to contact CERT-IN (the Indian Gov’s Computer Emergency Response Team) for this issue. I provided all the technical details (HTTP Traffic, steps to reproduce) over email on 25 Feb 2020. Earlier they were not able to reproduce the issue at their side, so I provided screenshots and more details in the subsequent communications. That day I got many OTPs trying to login to my account – I guessed someone at CERT-IN was trying to test the issue (in the steps and screenshots I had provided my phone number, so they might have tested using my number). I tried to check if they were able to test this and again a follow-up mail after a week, but they never replied.

The issue is still OPEN on the website (today, 11 April 2020). Anybody can login to someone’s Eureka Forbes account by just knowing their phone number. If you know someone who works at Eureka Forbes or Quinnox, please ask them to contact me at bhumish[at]live[dot]com.

~~~

Bugs — Easy To Find, Tough To Report

A common complaint that you often hear in Infosec is how hard it can be to report vulnerabilities sometimes. This story tells of my journey using OSINT tools to find the right person to responsibly report a bug to. Of course, I enjoyed the journey more than the destination.

The story of my bug: Even today, you can still find lots of misconfigured S3 buckets chock full of juicy data. I recently found one which contained a lot of personal documents belonging to the employees of a electric vehicle startup, lets refer to them with a made up name to save them some face. Lets call them EVzap.

EVzap provides their electric vehicles to cab companies along with their own trained drivers for the vehicle. These drivers need to provide their documents, things like their driving license, proof of ID, tax documents, proof of address and so on to the company for their background verification. Later EVzap provides their own EV driving permit to these drivers, along with the report of background verification. All these documents were publicly available in their poorly configured bucket.

Finding the bucket was very easy, a few keyword searches for the filenames and you get your data. The tough part for me was what comes next, how to contact this company and responsibly report the vulnerable bucket leaking personal data.

How I got to the right person: I took my first step and checked the Contact page on their website to shoot then an email and I instantly got a reply, there was no such email address and my mail had bounced. At that moment I felt pity for EVzap, they couldn’t even setup a simple email, one which was their primary contact listed on their website. Later I searched for the email-id of some employees, but happened to find only one, the email-id of their CEO. I thought it was alright to mail him for this issue, since I couldn’t find any other contacts and the issue was critical. I sent him an email, but nothing happened for 3 months. I almost forgot about that bucket full of data.

But then last week I remember them and realized that I had to find someone at EVzap and ask them to remove the (still publicly available) personal data. After an intensive search on Google I found a phone number for their office. Ironically, this number was not om their Contact page, I found the number from an article I stumbled across which talked about a partnership between EVzap and a cab company.

I called their office but the receptionist was clueless about ‘who handles their software’ or ‘who the IT person was’. She did gave me the number of a person handling their engineering division though, so I called the engineer who was helpful,  he said “Oh, so you need to contact Alvin for that. Wait, I can share his email address after confirming with him. Call me in the second half of today.

I thanked him and felt relieved, I then tried searching for Alvin on LinkedIn, he was there but was not very active. I sent him a connection request, hoping I would connect with him and I called the engineer later in the day but he didn’t pick up my call. I texted him but never got a reply. I started to feeling pity as their bucket still leaked.

The next day I looked for more employees of EVzap on LinkedIn and found some people from their tech department. I knew that the domain of their emails would be “@evzap.co” so tried to guess the email-id like “name@evzap.co”, “name.lastname@evzap.co”, “name-initial+lastname@evzap.co”. Some emails bounced, some never saw a reply. I added one more guy from EVzap on LinkedIn, and he was quick to accept. I messaged him about the issue and he also said the same thing – you need to contact Alvin, here’s the LinkedIn profile of Alvin. I mentioned that Alvin doesn’t seem to be active on LinkedIn, and requested him to give Alwin’s official email-id. He quickly shared Alwin’s official address and I was very thankful!

So now I had the official email address of the right guy. End of the story? Nope!

I mailed Alvin, but he didn’t reply. I waited a day, sent a follow-up but still no reply. I wanted Alvin’s phone number, so I went to his LinkedIn profile and saw something interesting – he was the founder of an IT consulting company.

Tried searching for that company, found their website which proudly displayed the message “Under Maintenance”. More research told me that the company had been permanently closed since 2018. Now the Wayback machine (archive.org) ccame to my rescue – I went to the last snapshot of that company’s website. That snapshot also contained their Contact page, which this time had a phone number listed. How to know if this number belonged to some HR person or Marketing guy or the Receptionist? Truecaller comes to my help. When I entered that number in Truecaller, the search result said – Alvin Philip. Now I got a feeling of achievement which was was even better than the moment when I have found that open bucket with all the PII data.

Quickly I gave a call to Alwin on that number, he picked up and I told him about the bug. He was totally unaware that such mis-configurations happen in S3. I explained him all the details – how I found the bug, what documents were exposed, what he needed to fix. He confirmed everything with his laptop in front of him, thanked me and said that he would reply to my mail. Next day the bucket stopped being leaky.

I still haven’t received an email reply from Alvin though.

The moral of the story is that the tools that we use in our daily life can be super helpful, we just need to tweak them according to our need.

Also that bugs remain hard to report and ours can be a thankless job sometimes 🙂

~~~ Eti

Fraud Android App in the name of Jio Prime

I am following an Instagram page with about 130K followers. These pages post ads sometimes when they get paid for them. One such ad said – “Get 10GB Data Everyday for Free for 3 Months – for Jio Prime Users”. Since I am a Jio user, I got curious to check this and was sure – this was some kind of fraud going on, and the ad was not by original Jio — they were using the name of Jio to milk their followers, since many of the users use Jio for their data connection.

I visited the URL (link) and downloaded the mentioned APK (JioPrime.apk), which is hosted on Google Drive. Turned-on the emulator and loaded this APK – yes, the icon was same as Jio’s logo (spot the app named Jio Prime in screenshot below). On opening the APK, it gives look-n-feel similar to MyJio app (the self-service app for Jio customers):

It asked me to provide my phone number. I started capturing the request/responses with Burp to look for anything malicious – I entered my mobile number and it gave me the loading screen, saying something is happening in the backend. Any user will be convinced by the different pop-ups saying: ‘Connecting to Sever…’, ‘Connected’, ‘Activating Offer’. Next it took me to “Share with Whatsapp” screen, where it asked me to share it with 10 users on Whatsapp.

But there were no network connections till that point, and then it started sending some data to Google Adwords URL.
Next, I entered mobile number as 0000000000, and it still accepted my mobile number as valid Jio number and showed me the loading pop-ups, next with the Share on Whatsapp screen. Since I don’t have Whatsapp installed on the emulator, I was not able to test further, but I was sure that they were sending user clicks to Google Adwords.

The MobSF analysis results are here:

1. Some of the dangerous Android permissions asked by the app:
a. READ_EXTERNAL_STORAGE
b. WRITE_EXTERNAL_STORAGE
c. READ_SMS
d. ACCESS_FINE_LOCATION
e. SYSTEM_ALERT_WINDOW

2. Below is the list of malicious URLs and Domains contained in the APK. When you “Share via Whatsapp”, your contact will receive the link like “Activate this service before*\n*12:00AM Tonight to Enjoy*\n*25GB/Per Day!!*\n\n*Team Jio.*\n\n*Link* : http://tiny.cc/Jio-Free-1Year;


Later I uploaded the APK to VirusTotal for their analysis. One thing that attracted my attention was a Service named “er.upgrad.jio.jioupgrader.Coinhive“. While Coinhive (link to KrebsonSecurity article) is a cryptocurrency mining service, this app could be a miner in the name of Jio. Eat the process of user device, earn money for the APK owner.

Four (4) Engines at VirusTotal also marked this app as malicious, screenshot here:

virustotal

Takeaways:

I could just see their JioPrime ad on 1 page on Instagram, but not sure where else they have posted their ads and how many victims have installed their APK. Also, since the app is having dangerous permissions (like Read & write external storage, read SMS), I am sure they would be accessing and sending this data somewhere.

It is highly recommended not to install APKs from unknown sources. Even some of the Google Playstore apps have malwares in them, but that’s totally a different topic.

To-do:

– Check if it is mining any cryptocurrency
– Reverse Engineer the APK for finding out the creator of the APK and the relevant Adwords account
– Check if it is really not making any network connections other than the Adwords part
– What data from user device is being accessed, whether it is being sent anywhere

In case you have free time, please feel free to do further analysis of the APK and provide more malicious vectors.


~~

A Trip to Bhuigaon Beach

Bhuigaon beach is located near Bhuigaon village in Nala Sopara, Palghar district. I first heard about it on a Reddit post, where it was mentioned that it is a clean beach with less crowd (compared to other beaches in Mumbai, Vasai and its surroundings).

I travelled there by my car, took about 1 hour 40 minutes from Palava city. If you are travelling from Mumbai suburbs or Navi Mumbai, it will take nearly the same time if you leave early in the morning. Road is good till the beach, and it has greenery once Vasai starts.
If you are following Google Maps, it will probably take you through the Vasai-Gass road  -which is a nice place for a morning-evening walk. In the middle, it has gardens near the Tulja Bhavani Mandir. These are very beautiful ones with small lake inside and some children playing area. Very well maintained by the authorities. I visited the garden while coming back from the beach.

IMG_0786
Vasai Gass Road

IMG_0784
Pond in the garden of Tulja Bhavani Mandir

After the Vasai-Gass road, you will passs through tiny roads with greenery on each side which is a very scenic view – coconut, banana and palm trees and vegetable farms. At some points the road gets very tiny and only 1 car can pass through it.

I went by my car and wanted to reach the exact point shown in Google Maps. I drove till I reached a closed gate. Scooters were parked on each side and there was no option for me to go further or take a U-turn. Took the car in reverse for some distance till the turn and parked near a paved road.

Its a 5 min walk till the beach. Green fields on each side and then a tiny jungle of Suruchi trees.

IMG_0742
Took picture from where I had parked my car. It seems that the rain water has collected here.

IMG_0743
Way towards the beach. Beach is after the colony of dark green trees. Below is the picture of green fields on left.

IMG_0744

IMG_0745
Suruchi trees


The beach had dumps of garbage at some places in the morning. 4-5 young people were cleaning the beach by picking up plastic bags, flowers, water bottles – collecting all the garbage and depositing it to a pit for later fetching.

The beach was clean at some places with very fine sand. Sand is somewhat darker at this beach. Water was clean in the morning. If you like collecting sea shells and pebbles, this is a great place.

IMG_0746IMG_0747IMG_0749

I went to the right side of the beach where a small stream separates the Bhuigaon and Kalamb beach. This narrow stream is used by fishermen to anchor and launch their boats in the sea. Lots of garbage could be seen on each side of water. Also, the mud is very soft and you need to take care not to get stuck in it.

I guess the source of all the garbage on the beach is this stream – which gets dumped with waste from interior parts of the town. This polluted water then flows to the sea and during tides, the same garbage is brought to the shores.

IMG_0771
The stream of water, with all its garbage

IMG_0774
Bhuigaon beach as seen from the Kalamb side. Left is the tiny forest of Suruchi trees. During high tides, this part is under water.

This place is not very far from Vasai city, and can be accessible through personal vehicle or by an auto (which can be taken from Vasai/Bhuigaon).

Overall, Bhuigaon beach is a great place for a picnic with family-friends. Evenings are usually crowded, its better to come here early morning. Children can enjoy playing on the flat shoreline and collect pebbles. Walking on grass between the Suruchi trees is also a nice experience. You should visit this beach if you are looking for a calm place. Traffic may not be a problem, and this place can be reached easily within half hour from the Mumbai-Ahmedabad highway.

IMG_0780
Narrow and green road, while walking back from the beach

IMG_0778
Flowers! On the same road, on my left.

IMG_0761
Suruchi trees giving a good pose

IMG_0757
Beach!

IMG_0754

Here are some tips:

  • If you are travelling by your car, park it before the last turn (near a small compound-wall). If you go further, you will get stuck because of the narrow road. There is no place for turning the car around.
  • Visit the beach during early morning hours, it would be very less crowded and peaceful. If you want to view the sunset, visit during that time.
  • Bring your own food and water, if possible. Only 2 stalls available here.
  • Do not throw any garbage except in the dustbins. There are 4-5 dustbins available and easily noticable (blue coloured big boxes).


🏄🏊 🐚🌴🍹☀️


Tags: vasai, nalasopara, bhuigaon, bhuigaon beach, beaches near mumbai, mumbai, beach, vasai beach

Login Bypass Vulnerability on a famous Indian Restaurant chain

TLDR: While ordering dinner for me, I came across a bug where I could login to anybody’s account and view their details (like name, email address, home address, order details). This issue was fixed on the same day of reporting to the concerned technical team.

Lets name the company FoodieExpress, which serves fast-food in their restaurants, allows take-away of food and does home-delivery of food (when ordered over call, mobile app or website).

For login to their website/mobile-app, there is only one method – OTP login. You have to enter your registered mobile number, you will receive and OTP and enter it on the screen – you will be logged in. In case the number is not registered, OTP will be sent to the number and you have to provide your details (name, email-id, delivery address, etc).

The issue was here – you can bypass this OTP and login into anybody’s account. If the user is not registered then you can create their account without any consent.

For trying one happy/valid scenario, let’s order some food from FoodieExpress. My number 1234512345 is already registered with them.

  1. When I click on ‘Sign In / Register’ button on FoodieExpress website’s Homepage, it takes me to the Login page (https://foodieexpress.co.in/login).
  2. Page asks me to provide my mobile number, where I provide 1234512345 as my number.
  3. I receive an OTP on my phone, lets say 9876.
  4. I provide OTP 0000 on the next page – it says ‘Invalid OTP!’
  5. Correct OTP 9876 is provided, and it allows me to login. After login, I am able to go through my profile to see my personal details, saved addresses, order history, track and existing order, etc.

Something technical, what happens at the back-end in the above scenario:

An API call, named ‘api/cart/validate-cust-otp‘ is made to the server foodieexpress.co.on:443, which contains the OTP entered by the user. For example,

{ 
"otp": "9876" 
}

Server checks the OTP, either it is correct or incorrect and responds to the browser accordingly. The HTTP response can be either of these 2 –

(a) If the OTP is incorrect

{"messageCode": 1015,"Message":"OTP is Invalid or Expired ","ErrorCode": 0}

(b) If the OTP is correct

{"messageCode": 1001,"Message":"Successful","ErrorCode":0}

The browser proceeds on the basis of this response from server. If we make changes to this response message by using a Proxy tool (e.g. Burp suite), the browser will be unaware of that and may allow us to proceed considering the modified response from proxy.

Both these above responses are used to exploit the security issue.


How to exploit:

  1. Setup your browser to use a proxy for HTTP/S request-responses
  2. Enter your desired mobile number (can be your friend’s number, or any unknown victim’s number)
  3. OTP will be sent to that number, and you are not aware about the OTP
  4. Enter the OTP as any random 4 digit number (e.g. 0000, 1234, 2521, 0914) and intercept its HTTP response
  5. This HTTP response will be similar to (a) mentioned above, replace the text with the content given for (b) – successful
  6. This will tell the browser that authentication is successful and later all the further process will take place considering the authentication of victim user
  7. You will be logged in to the victim’s account!

Logging in to someone else’s account is this easy – by just changing the authentication response! Later I had a discussion with the security team managing the website, they understood the issue and fixed it on the same day – a very quick response from their side.

Here I am not providing any details about the Restaurant chain or the Web-development company, as requested by the stakeholders.

✿✿✿

Cycling trip to Padle Village (Part 2)

The second trip to Padle village was for exploring the forest on my cycle. I thought I was prepared for the trip, but I was wrong, and had to pay it with my blood – to the mosquitoes. There were thousands of mosquitoes, who will not spare you. My advice – wear full sleeve shirts, full length trousers, socks-shoes and apply Odomos on your face, neck and hands. Now you are ready to kick-off for the journey —

IMG_20180422_070246.jpg
This is the jungle as seen from the main road to Padle Gaon Bird Watching Point

My first destination was the spot where I had cycled last week. While going to that spot, this jungle falls on your left side, and you need to find a way to enter this forest. The small way is not noticeable, you may miss it.

The ‘Padle Gaon Bird Watching’ point had more water in the creek, as compared to last week. It was also clean, comparatively.

IMG_20180422_070546
Both pictures taken from the same spot as last week, with more flowing water

IMG_20180422_070559

I went back to enter the forest. I was not sure whether my cycle would be able to handle such roads. But it coped well, and had a nice experience using my MTB on such roads.

There was greenery everywhere, and dry leaves lying on the ground. I had heard that there are snakes in this forest, but didn’t encounter one.

IMG_20180422_071252
Was welcomed with these sun-rays

IMG_20180422_071738

There were some canopies formed, sparse on the roads and dense inside. This road connects Mothi Desai village to some farms situated near Desai Khaadi on the north

The forest was dense from the inside. It had the cool effect – as if the hot sun didn’t have any effect on it.

I enjoyed this trip, and would be planning one again to explore the insides of this jungle on foot. With more preparation, more equipments and some food/water. Yeah, being a gujju, I may bring some thepla and achaar to this place.

IMG_20180422_071445IMG_20180422_072250IMG_20180422_072132

IMG_20180422_072445
This was the way back to Padle village. Don’t know where the left turn goes – added this to my list, will be exploring in the next trip.

~~

Eti.

Tags: #cyclingtrip #Padle #padleGaonBirdWatching #PadleVillage #CyclingPalava #Palava #explore #Dombivali #cyclingneardombivali

Cycling trip to Padle Village

While looking for places for a short cycle trip around Casa Rio (Palava City), I had found a place name ‘Padle Gaon Bird Watching’. There is not much information about this place on the internet, except – “some groups come here randomly for watching & photographing birds, snakes are spotted sometimes, and there are a lot of mosquitoes”. I thought to explore this place on my cycle, since this was about 6 kms only.

I started at 06:30 in the morning, took a turn towards Padle village (opp Mukta Apartments on Kalyan-Shil road) and reached the village in around 20 minutes. I was riding my Rockrider Five.Zero bike, pic below:IMG_20171209_072457

Padle Gaon looks like a tiny village with basic amenities. On the way to Padle from main highway, there are small farms and a few farm-houses with big cars. Google Maps will show you a road with right turn after you reach Padle, while in real there is no ‘road’. Its just a paved way with lots of stones, which might puncture your cycle/scooter. I would not recommend taking a car, since it will not be able to pass through the narrow street of Padle.

I followed the way, which took me to a open field, where it seemed like the crop was recently burned. There is ‘Desai Khaadi’ on one side, with dark water, and on the other side there are fields till your sight reaches. The way to this place has forest on one side, which is also called ‘Mothi Desai Village Park’ – Google Maps link. You will find the birds and other flora n fauna in this park. While I was passing through it, I heard the voices of different birds – and it seemed like there are several of them. As I was not properly suited for this, I skipped visiting this park – instead went to sit near the flowing water.

IMG_20180415_065541
Open field, the distant building is Marathon Nextown


IMG_20180415_065519
Desai Khaadi, picture taken from the same spot as above

I was not able to find a single human being around this place, while I was there. A dog was spotted eating something from the garbage, who ran away as I reached there. While the crop was burnt, this tree also got burnt, losing all its leaves:

IMG_20180415_065729

The point Padle Gaon Bird Watching (Google Maps link) has a small roofed area where one can sit, which is mainly used by the fishermen to board when the waters are high. There were fishing nets, hooks and some boats lying around. One was nicely coloured and hence I took a picture of it too:

IMG_20180415_070059

Boat parked on road

When I was there, the waters were low (since it is a Khaadi/Bay, here the waters rise and fall accouding to the tides). It is a good place to hang around. If you are feeling more adventerous, you can cross the waters from the rocks placed in between when the waters are low (I recommend not to do that, you might get stuck on the other side if the waters rise suddenly). These rocks are placed for convenience of the fishermen to take their boats to shore with less efforts, and they also give good effects to the waterways. Pictures below:

IMG_20180415_070209
Boat parked, ready for its journey when the waters rise! These rocks make a wall like structure to obstruct water at some places – easing the crossing of bay and reducing the water current at some places.

IMG_20180415_070222
Rising sun, pic taken from nearly the same spot as above. 

I enjoyed this trip, though I was scared of getting my cycle punctured on the way. If you come here next time with some food, water, full clothes and shoes, you can explore the forest (Village Park) and also spend more time to roam around the fields and shores. I will be going here again to find out more about this beautiful place.

~~

Tags:

#palava #placesaroundPalava #CasaRio #PadleGaon #BirdWatching #CyclingPalava

Bypass Root detection in Android [by modifying the APK]

Developers implement root-detection mechanism in Android to prevent users from using their app on a rooted phone. The app (apk) will implement different checks to determine whether the phone is rooted or not. Later, after this check, if the phone is rooted then the APK will display some message like “This device is rooted, exiting the application”, or “This application will not work on rooted device, exiting!”, and it will exit the application.

  • How to bypass this – (a) the APK checks at the device level and determines that the device is rooted, (b) APK will display the message and close the application.
  • Between the step (a) and step (b), let the APK know that the device is rooted – but before it gives the command to exit the application – we can change the code to not exit the application even if the device is rooted.

Below are the technical steps to perform this. This method works most of the times, and doesn’t need Xposed modules or other tools.

Lets refer the APK/Application as test.apk for this article. Decompile the APK by using apktool, with the following command:

apktool d test.apk

The code of this apk will be available in a folder named ‘test’. There will be smali files in the folder, which will have all the application code.

Search for text like ‘rooted’, ‘exiting’ or ‘root’ – according to the message which is being displayed when you start this application on a rooted phone. Note the name of the file which is containing this text, open it in a text editor.

Functionality will be like this:

  • APK will check the device is rooted:
    • if yes (e.g. equals to 0),
    • exit
    • if no (e.g. not equals to 0),
    • continue

If you make the condition as ‘not equals to 0’, it will not exit and allow the application to run. After making this change, re-compile/build the APK by using apktool with following command:

apktool b test test-new.apk

A new apk will be created with the name test-new.apk, and then create a key and sign the apk with following commands:

keytool -genkey -v -keystore my-release-key.keystore -alias alias_name -keyalg RSA -keysize 2048 -validity 10000
jarsigner -verbose -sigalg SHA1withRSA -digestalg SHA1 -keystore my-release-key.keystore test-new.apk alias_name

Now the APK is built, signed and ready for installation. Install this APK by using ADB and now it will allow the application to run on a rooted Android device.


~~~


UTI ITSL – Data Disclosure through a single key

NSDL and UTI are two bodies under the Indian Government which are the official PAN Card service providers. Recently I had the privilege to take services for PAN Updation through UTI ITSL.

After waiting for some time for the processing of my card, I went to the website of UTI-ITSL for checking the status. I entered the application number, and instantly got the status of my query. Cool!

As a fuzzer, in the form-field for ‘Application Coupon Number’, I entered the next number (my appln number + 1). And yes, it gave the results. Entered some more numbers in the sequence, got results for each query. I could get results for applications as early as 2011. This means that if someone runs a tiny script to scrape data of applicants for the last 8 years, they can easily get the details – Full name, PAN Number, Application Number.

Details
Name, PAN No, Courier Tracking Details

As shown in the above image, all these details are visible to everyone without any kind of authentication, you need to just input a 9-digit application number.

And there is something more to that – you can look for the PIN Code and City of the applicant, through the Courier Tracking Number:

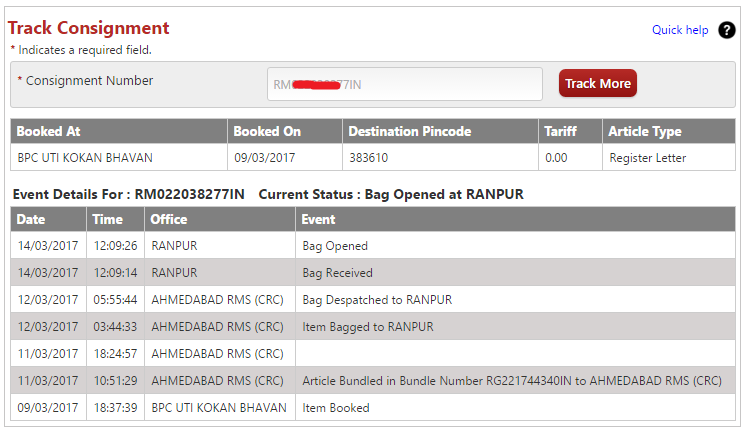
Post Office Track
This PAN Card was delivered to some guy in RANPUR (Gujarat) on 09-03-2017, most probably he lives there

If you are more lucky, you will get the birth-date and spouse/father’s name of the applicant:

Mismatch 1

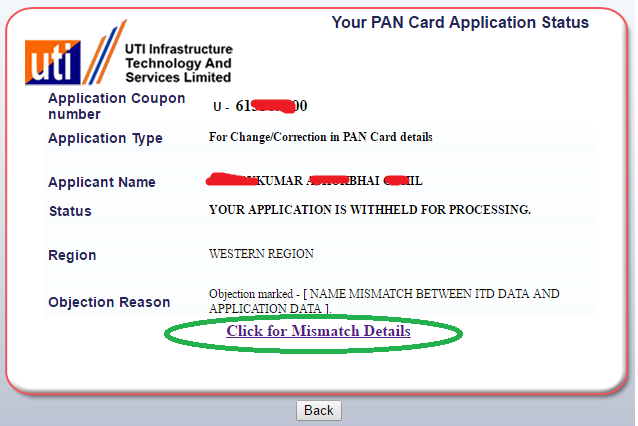
For the above applicant, he is having name mismatch between Income Tax Department’s Data and the data provided in the application. So which fields are required to be shown to the applicant – only the field which is having some conflict, right? No, even if the DOB which is totally irrelevant in this case of name mismatch, it is shown. Proof below:

Mismatch 2
In case of Name mismatch (field highlighted by pink by the UTI guys), Father Name and DOB are also displayed

With some modification in the script to scrape all this data, we can fetch the DOBs for all the people who are having such mismatch in their application. Later through correlation, we can get the below details for a single applicant:

  1. Applicant’s full name
  2. Applicant’s Father’s full name
  3. Applicant’s DOB
  4. Applicant’s PAN Number
  5. Applicant’s PIN Code and City

This can count as a huge flaw in the design of their application which gives such golden data with very less efforts, and exposes the PII of millions of applicants.

Some suggestions for UTI developer guys:

  • Randomize the application numbers, if possible, and
  • Please do not allow anyone to query your database with a single key. At-least use two keys (e.g. 1. Application Number & Date – Time of application, 2. Application Number & UID Number)
  • Don’t provide the status if it has been a month after the PAN card is received by the applicant


(I tried to contact the people at UTI ITSL: their email (utiitsl.gsd@utiitsl.com) bounces back, no-one picks up the phone, and for snail-mail I don’t have the postal stamps)

Eti.


Instagram – Are your posts really private? (Part I)

You are using Instagram, right? And you might have kept your posts private, so that only your followers can view your posts. Yes, even I have ticked the option to allow only my followers to view my posts.

Private Posts

That option works well if you are browsing through Instagram only. But what if you post your Instagram picture’s link like this:

tweet

The post on your Instagram profile was limited only to your followers (maybe 150, 1500 or 150k), but now your tweet has made that picture available to millions of people who are on the Internet. Anybody can click on the link and see your picture.

My Instagram picture, as viewed in logged-out mode
My Instagram picture, as viewed in logged-out mode (https://www.instagram.com/p/BB4FvaowiZvxmolkohvwNRpf97HWls0Rel9wZI0/)

Although, when you visit my profile, you will see that my account is private!

private
My Instagram picture, as viewed in logged-out mode (https://www.instagram.com/p/BB4FvaowiZvxmolkohvwNRpf97HWls0Rel9wZI0/)

Instagram should follow one rule- if an user opts to have a private profile, you need to make sure (from server side) that the posts remain visible only to the followers on Instagram.

Remote logging with Rsyslog

RSYSLOG is the rocket-fast system for log processing. After syslog, now rsyslog comes pre-built with the Linux systems, meant for local and remote logging.
In any system, you will want to (a) log the system and application logs on the local machine, and/or (b) log the system and application logs to a remote machine.

Below given are 2 cases, useful for forwarding OS logs and application logs:

  • Forwarding only OS logs:

Add the below given line at the bottom of the /etc/rsyslog.conf file, and later restart the rsyslog service-

*.info;authpriv.*;cron.*;mail.*     @remote_ip:514

By default, rsyslog uses port number 514 for its activities. If the logs need to be forwarded through UDP, mention a single '@' before the remote_ip, and for TCP, mention '@@' before the remote_ip.

*.info – all logs with info severity

authpriv.* – all logs related to authorization and privileges

cron.* – all logs related to cron – scheduled jobs

mail.* – all logs related to mail and mail servers

  • Forwarding OS and Application logs:
# Add the following module - it is the module for forwarding logs from a file.
# Add this along with the other $ModLoad tags at the top of the file
$ModLoad imfile
# Add 'local7.none' to the below line as shown below.
# This will stop the logging of local7 messages in /var/log/messages, as we need to forward our application logs through local7 service
*.info;mail.none;local7.none;authpriv.none;cron.none                /var/log/messages

# Comment the local7 for boot logs, to stop logging the application logs to /var/log/boot.log which we are forwarding through local7 service
#local7.*                                               /var/log/boot.log

# Add the below lines to forward the logs from their respective files. First 3 lines are variable, the other 2 are static.
# $InputFileName takes the path to log file (absolute path of the file)
# $InputFileTag will attach the mentioned tag (here: tag_jio.com) to the original log
# $InputFileStateFile is the State file where the logs are stored before forwarding (for eg. useful in case of network failure)
$InputFileName /path/to/log/file
$InputFileTag tag_website.com:
$InputFileStateFile buffer_file_name
$InputFileFacility local7
$InputRunFileMonitor

# Add this line at the bottom of the file, for forwarding
# local7.* (all logs of local7 - application),
# *.info (all logs with info level),
# authpriv.* (all logs of authorization-privilege) and
# cron.* (all logs of cron)
# - to the receiver IP and Syslog port 514.
# Add '@' for sending logs through UDP, '@@' for TCP.
local7.*;*.info;authpriv.*;cron.* @receiver_IP:514

(Above given configuration is for Red Hat based systems only. It may differ in Debian based systems.)

Common Troubleshooting Steps:

  • Check network connectivity between the sender and receiver – Firewall port opening (Port: 514 – TCP/UDP), Ping, Traceroute
  • Check if logs are present at the mentioned log file path
  • Check the ‘space’ and ‘semicolon’ in the rsyslog configuration file
  • Change the $InputFileStateFile’s value to something else (eg. change buffer_file_name buffer_file_name to buffer_file_name_1)
  • Restart the rsyslog service

SSL/TLS and Your Browser

SSL in Browser


SSL/TLS provides an extra layer of security to the HTTP, making it HTTP Secure (HTTPS). It works on the Application Layer (OSI Model) along with HTTP. HTTPS is not a different protocol, but the underlying HTTP with implementation of SSL/TLS for security.

Public Key Infrastructure and Certificate Authorities are used for making it possible.

How HTTPS works?

Short Version
Just like the TCP Handshake, a handshake happens in SSL between the server and the client. We can break this handshake into three steps: Hello, Certificate exchange and Key exchange.

Hello

The client sends a Hello message and the server responds with its Hello message. These messages contain information like the SSL version supported, cipher suite and some random data for key generation.

Certificate Exchange

To provide its authenticity, the server has to send its SSL certificate to the client. On receiving the certificate, the client checks whether its verified and trusted by some Certificate Authority, and takes the decision accordingly. For some sensitive applications, the server can ask for a certificate from the client too.

Key Exchange

A symmetric key is exchanged between the two parties. The client computes a key, encrypts it with the server’s public key, and sends it to the server. Only the server can decrypt it, by its own private key. All the communication then takes place encrypted with this symmetric key.


Long Version
Client Hello

After the TCP connection is established, the clients starts the SSL handshake. The important data in the Client’s Hello message includes:

  • Version Number (eg. SSL 2.0, SSL 3.0, TLS 3.1)
  • Random Data (which is later used with the Server’s Random Data to generate a secret key)
  • Cipher Suite (the list of cipher suite available with the client, which includes – the protocol version, the algorithm for key exchange, the algorithm for encryption, and a hash function)

The Client Hello message can be:

ClientVersion 3,1
ClientRandom[32]
SessionID: None (new session)
Suggested Cipher Suites:
   TLS_RSA_WITH_3DES_EDE_CBC_SHA
   TLS_RSA_WITH_DES_CBC_SHA
Suggested Compression Algorithm: NONE

Server Hello

The Server responds with its Hello message, and some of its fields are:

  • Version Number (The highest version which both of them – server & client support)
  • Random Data (which is later used with Client’s Random Data to generate a secret key)
  • Cipher Suite (the strongest cipher suite which both server & client support is chosen by the server. If there is none, the session will be ended with ‘handshake failure’)

The Server Hello message can be:

Version 3,1
ServerRandom[32]
SessionID: bd608869f0c629767ea7e3ebf7a63bdcffb0ef58b1b941e6b0c044acb6820a77
Use Cipher Suite:
TLS_RSA_WITH_3DES_EDE_CBC_SHA
Compression Algorithm: NONE

Along with the above mentioned details, the following steps take place in the Server Hello message:

  • The server sends its digital certificate to the client, which has the server’s public key
  • Server creates a temporary key to the client
  • Server asks the client for its certificate, to validate the client’s authenticity
  • End of hello, meaning the server’s Hello message is done, and client can respond

Client Response

After getting the server’s Hello Done message, client starts talking. It sends the necessary messages in the below mentioned sequence:

  • Client certificate – contain’s the client’s public key, to provide its authentication at the server
  • Client Key exchange – the most important part of the communication. The client computes a premaster key from both the random values previously exchanged. This key is then encrypted by server’s public key before sending it, so that only the server can decrypt and get out the original key with its private key.
  • Change cipher spec – all the further messages will be encrypted using keys and algorithms negotiated
  • Client Finished – is the hash of the entire conversation. This is the first message which is encrypted and hashed for the session.

Server Final Response

This is the final message in the conversation between the server and the client to have a secured connection. The server’s final response will have:

  • Change cipher spec – will notify the client that the server will start encrypting the messages with the negotiated keys and algorithms
  • Server Finished – is the hash of the entire conversation to this point. If the client can decrypt this message and validate the hashes, it means that the SSL/TLS handshake was successful.

After the SSL/TLS handshake is done, further communication is secure between the server and the client.


Example

A representation of how your browser starts a HTTPS connection with website example.com-

  • Firefox (your browser, for example) connects with the server of example.com with HTTP and asks for the login page which uses HTTPS
  • For the communication, the server sends Firefox a certificate, which contains the server’s public key
  • Firefox verifies the public key of the server from the certificate
  • Firefox chooses a random symmetric key and encrypts it with the public key of the server
  • On receiving the encrypted message, the server decrypts it with its private key. Nobody else on the network who has received the encrypted message can decrypt it, because they don’t have the server’s private key. Now the server has the symmetric key with it
  • Every time Firefox wants to send something to example.com in a secured manner, it will encrypt it with the symmetric key. On the other end, the server will decrypt it with the same key

Every website/server which wants to implement HTTPS (i.e. SSL/TLS security) has to buy SSL certificates from authorities like VeriSign, Comodo, etc. Many websites implement HTTPS part only for some important pages (like login or payment) and other parts of the website work on simple HTTP. Implementing HTTPS for the whole website is not much costly, but the CPU overload increases in processing the requests. Hence many website owners keep away from HTTPS because of the cost factor or the overload factor. Recently Google announced that it will reward the HTTPS webpages with a higher ranking in its search results (source).


Why not use asymmetric key encryption for the handshake?

There’s an answer on StackExchange. (1) Asymmetric encryption is much slower compared to symmetric encryption, (2) For the same keylength, asymmetric is weaker compared to symmetric encryption.

What an attacker can see if you are using SSL/TLS during your connection?

If you are using SSL/TLS correctly, the attacker can interpret only some of your data. That includes – the domain you are connected to, the related IP address and port numbers.

For example, if you are doing a Google search using https, the URL in the browser will be: https://www.google.co.in/?gws_rd=ssl#q=what+is+https, and you can see the full URL. But on your cable, only the domain name google.co.in is sent to the DNS for domain name resolution, instead of the full query/URL. Hence, you can say that HTTPS hides your full URL, only the domain name is revealed.

HTTPS provides confidentiality of data, but not anonymity of who is sending / receiving the data.

This interactive image by EFF provides clear understanding of what can be seen by the eavesdroppers while you are using HTTPS and while you are using Tor.


(References: SSL/TLS in Detail, An answer at StackExchange)

Snort on DSL connection

I was proficient with working on Snort on my eth0 connection during my previous Ubuntu installation. Later, I changed to Fedora, and eth0 was replaced with eno1. And the other change – I started using a direct DSL line, which used the ppp connection.

Now while doing ifconfig for the DSL connection, I get the interface as ppp0 instead of eno1.

ifconfig - ppp0


The limitation with Snort is that it will consider only the ether packets, ignoring the ppp0 connection. Even when I am using the ppp0/DSL connection through my Ethernet port, the connection is not through eno1.

If you try starting the Snort instance with the command

# snort -c /etc/snort/snort.conf -l /var/log/snort/ 

it will give the following error:

ERROR: Cannot decode data link type 113
Fatal Error, Quitting..

Snort initial error

If you try looking for the error, you will get a variety of solutions. If your snort version is 2.9.6.1, none of them are going to work for you. The reason is – they have stopped supporting the –enable-non-ether-decoders.

If you put that argument with your command for igniting Snort, you will be provided with a list of available arguments, but –enable-non-ether-decoders will not be allowed. I was furiously looking for a solution regarding this problem. After going through some forums, it came to my mind to try a walk-through.

The easiest option available was to make Snort work with the ppp0 connection (which is plugged in to eno1) work with eno1.  You have to try giving the command with an additional argument, which is -i eno1:

# snort -D -i eno1 -c /etc/snort/snort.conf -l /var/log/snort/

This will start the Snort Daemon on the eno1 interface, capturing all the packets and dumping them to your desired location. The logs will be located in files named snort.log.xxxx. For every instance there will be a new log file, which has the packets logged in Binary PCAP format to be readable by Wireshark, Snort, or other similar applications.

Snort Logs

If you try to read these logs with some text reader/editor, it will be like reading the Webdings fonts. Don’t do that. Snort has a better reader, also called Snort -r.

Give the command:

# snort -r snort.log.1405955899

This will give you a nice analysis of the packets with all the logs available to you. You can also export the readable content to a .txt file by the normal methods.

Snort -r Output

Choose the rules very wisely which you are applying for Snort. As this was for a test environment, I implemented all the available rules to the scenario; and that gave me 5 MB of logs when I ran Snort for just 25 seconds. You need to cut that down, Roger!

Parsing and getting the required information from these logs is one more task. Have you tried Splunk, lately? Here: http://apps.splunk.com/app/340/


TL;DR list your interface as eno1 even if you are using a ppp0 connection

SQL Truncation

SQL Injection. At the top in the OWASP Top 10 List.

I was going through some missions, and came across one with SQL Truncation vulnerability. It is an ignored vulnerability, and many have patched the vulnerability, but there are lots of websites which still have this vulnerability. Here I’m explaining you (ELI5) the basics of SQL Truncation and how the vulnerability is exploited.

Lets take an example of a website where a user can register himself with a username and password, and later login with the same username-password combination. Lets name this website pikachu.com

Whenever a user registers the username and password, using SQL they are stored in the table. For the table, there is some specific maximum-length for the username and password. Lets consider that the username and password should be max 20 characters. In the HTML form, the following would be given:

<td><label>Select an Username: </label></td>
<td align=”right”><input type=”text” name=”username” value=”” maxlength=”20″ /></td>

<td><label>Select a Password: </label></td>
<td align=”right”><input type=”text” name=”password” value=”” maxlength=”20″ /></td>

<td><label>Verify Password: </label></td>
<td align=”right”><input type=”text” name=”password” value=”” maxlength=”20″ /></td>


This enforces the user to have username-password of maximum length 20 characters only.

Now, suppose the user enters ‘pokemon’ as the username and some random password. It will be checked in the column of usernames whether a username ‘pokemon’ exists or not. If the username does not exist, the table will store ‘pokemon’ under the username column and the password for it in the password column. Here pokemon is the administrator of the website.

Now, we are the attackers and we want to login to that site with the username ‘pokemon’. Possible? Yeah, possible if it is vulnerable to SQL Truncation. The following scenario:

  • Use the add-on Web Developer (for Firefox) or something similar in your browser, to break the ‘maxlength=20’ barrier.
  • Create a new user ‘pokemon             b’, which exceeds 20 characters. After pokemon you need to have white spaces filling the 20 characters and then some random characters.
  • The application will search in the username column for ‘pokemon             b’, and doesn’t find any so will store it in the database with our password. But since the max limit is 20 characters, it will store only ‘pokemon             ‘ and since there are only white spaces, it becomes ‘pokemon’. If we provide just ‘pokemon   ‘ at the username registration, it will take only ‘pokemon’ as it truncates the white spaces – and hence we gave ‘pokemon             b’ where the trailing character ‘b’ will not let it truncate the white spaces.
  • Thus we inserted the user ‘pokemon’ into the database with our password, and now onward we can login with our own password and ‘pokemon’ username.
  • Whenever we use ‘pokemon’ as the username, now it will check the two different cells in the table with the same username, and will validate our credentials.

SQL Truncation is a type of SQL Injection, which is a low hanging fruit. If it is not properly patched in the application, can cause a severe damage to the application data.


(Reference: http://www.suspekt.org/2008/08/18/mysql-and-sql-column-truncation-vulnerabilities/)

Evading mod_evasive on Apache

These days, the server mostly used is either Apache or Nginx (ref: Netcraft). For Apache, there have been several security tips and a few modules for providing security. One of them is mod_evasive. If you refer basic server hardening tips, they would have recommended to install mod_evasive to secure your Apache against Denial of Service attacks. mod_evasive comes with some default settings which are not needed to be played with if you have a general purpose website.

How mod_evasive works:
(ref: /var/httpd/conf.d/mod_evasive.conf)

DOSPageCount, default: 2 – in 1 second

This is the threshhold for the number of requests for the same page (or URI) per page interval. Once the threshhold for that interval has been exceeded, the IP address of the client will be added to the blocking list.

DOSSiteCount, default: 50 – in 1 second
This is the threshhold for the total number of requests for any object by the same client on the same listener per site interval. Once the threshhold for that interval has been exceeded, the IP address of the client will be added to the blocking list.

DOSBlockingPeriod, default: 10
The blocking period is the amount of time (in seconds) that a client will be blocked for if they are added to the blocking list. During this time, all subsequent requests from the client will result in a 403 (Forbidden) and the timer being reset (e.g. another 10 seconds). Since the timer is reset for every subsequent request, it is not necessary to have a long blocking period; in the event of a DoS attack, this timer will keep getting reset.

Explanation: If an IP address requests a page more than 2 times in 1 second, or requests an object more than 50 times on the same listener in 1 second, the IP address will be blocked. It will be blocked for 10 seconds and all the requests during that time will be resulting into 403.

What I did:

  • Copied a website and all its objects using ‘wget’ and hosted the website from its source on my Apache server in the folder /var/www/html/
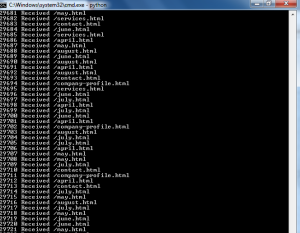
  • Created the below Py script to get a HTTP Connection to the server and GET the requested object.
  • lst is the list of site objects which were to be accessed using GET.
  • It randomly requests an object from the given list, avoiding repetition.
  • The same script used for all the 3 tests.

#####Start of Script#####

import httplib
from random import choice

lst = [‘/april.html’,’/august.html’,’/company-profile.html’,’/contact.html’,’/december.html’,’/february.html’,’/index.html’,’/inquiry-form.html’,’/january.html’,’/july.html’,’/june.html’,’/march.html’,’/may.html’,’/november.html’,’/october.html’,’/september.html’,’/services.html’,’/tide-table.html’,’/images/ani.gif’,’/images/back.jpg’,’/images/icon.gif’,’/images/banner.gif’,’/images/slogan.gif’]
n = 1
while True:
i = choice(lst)
httpServ = httplib.HTTPConnection(“127.0.0.1”, 80)
httpServ.connect()
httpServ.request(‘GET’, i)
response = httpServ.getresponse()
if response.status == httplib.OK:
print str(n) + ” Received “+i
httpServ.close()
n+=1

#####End of Script#####

Checking mod_evasive with default settings, requesting from the same machine (localhost):

Server: Apache 2.4.6
OS: Fedora
Client: Fedora, Python script

>>

Localhost 403

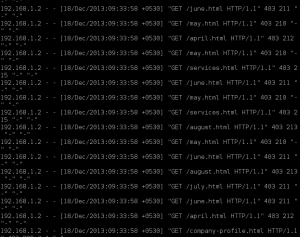
Running this script on the Fedora (localhost) machine causes the temperature of the machine to rise till 87 degree Celsius (The processing was Ctrl+Zed to avoid over-heating, as the point was proved). mod_evasive will definitely stop serving this script as soon as it will find that it is exceeding the threshold, but it will continue returning 403 to the script. The 200 response will stop and 403 will start; Apache will continue processing and serving 403 to the script. So what is the use of mod_evasive? Mod evasive is built for protecting against the DoS attacks, but here mod_evasive is the victim. It continues the processing the this keeps the busy and the single script will provide enough load to the server.

Checking mod_evasive with default settings, requesting from a Windows machine:

Server: Apache 2.4.6
OS: Fedora
Client: Windows 7, Python script

>>

Py script running on Windows
The same thing which happened from localhost will occur while sending requests from a Windows machine. After some time Windows will show that either it lacked sufficient buffer or the queue was full.

Forbidden (Windows)Error in Windows

Checking mod_evasive with default settings, requesting from a Linux machine:

Server: Apache 2.4.6
OS: Fedora
Client: Kali-Linux_x86, Python script

>>
Story continues here. Testing from a Kali-Linux, running the same py script, will DoS the Apache server. The main task was to flood the Apache server which was using the default configured mod_evasive module, and it was accomplished. Mr Mod_evasive, what is the meaning of sending 403 to the blacklisted IP every time? It does totally reverse, clogging the server and giving very less time for other client requests.

Kali 403

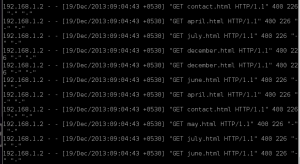
One more trick is to request for a non-existent object (eg. /hello-admin.html), and hence the server will be busy responding with 400 Not Found. We just need to keep the server busy with our requests, and this tiny-simple script does it all.

400

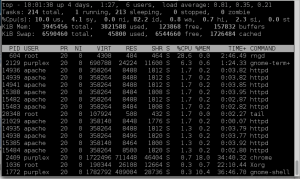
In the below screenshot it can be seen how much processing is done by apache/httpd while processing for the single script.

top results, high usage by apache

Here it can be seen how the temperature rises by 20 degrees in just 1 minute:

Temperature rise - ITemperature rise - II

In Plain Text: Using mod_evasive with default settings is of NO use as it does not stop serving the DoSing client but just responds it with a 403. The processing remains the same (kind-of).

Truecaller for BSNL Landlines

Here is a portal by BSNL where you can pay your Telephone bills online: https://portal1.bsnl.in/aspxfiles/instaPay.aspx. After a long time BSNL people have started making use of technology for public services, apart from providing basic broadband.

I have been paying my land-line bill online since 6-7 months through the same portal, and I had to provide my phone number and account number at the initial stage, and later I was asked for my bank details for making the payment. I guess people were confused with the account number field, and hence last month BSNL made some changes to the portal text fields. Nowadays we don’t have to provide the account number, and it serves as the Truecaller app for getting the owner’s name. Along with the owner’s name, it gives the outstanding payment details. I think in this way BSNL’s portal is not seriously considering our privacy. Anybody can get the name of the owner and the bill details by just providing their phone-number. It works for individual bills, and not for corporate.

Comparing the BSNL’s portal with Truecaller, it provides better facilities – we can get the verified name of the phone owner (as in BSNL database) and the current bill details. And the best point – unlike Truecaller, we don’t need to provide our authentication details or install the app on our phone for BSNL’s portal. This may not be a security issue for the customers, but it is totally violating the privacy.

(You can give it a try. Visit the Instapay portal. Enter the BSNL land-line number of your friend, and the captcha code. You dont need to provide any mobile number or email address. Click ‘Submit’ and you will be provided the land-line owner’s name and their outstanding amount.)

Phonebook course on Codecademy

After a Codecademy course which teaches the game of Rock Paper Scissor step-by-step in Python, last month I used the keyboard for creating a Phonebook utility on Python and put it on Codecademy. The Phonebook exercise there teaches users to create a file for storing contact name-number and later get them as desired. The exercise is under the Codecademy team for beta-testing, and will be avialable in the Track listing soon after reviewing. You can test the exercise here: Phonebook on Codecademy.

What is Phone-DNS and Why we can’t implement it now

DNS is the Domain Name System, the mapping of IP address to domain names (e.g. for websites like http://example.com). As the IP addresses are hard to remember, we have adapted the system of mapping the IP addresses to their respective FQDNs (Fully Qualified Domain Names). We just type the website address in the URL bar and the DNS server converts it to its respective IP address, which later serves us.

We all have phone numbers stored in our phone’s memory, mapped with the names. When we want to contact someone through our phone, it serves as a DNS server for us where we can just tap the name and the phone dials the number. Thus we all have a tiny DNS server in our pocket, but what if we combine all these tiny servers into a globalized service. Not like truecaller or something, but a more concrete and reliable service.

There has been Telephone number mapping service, for unifying the International telephone numbers with Internet addressing and name spaces (ref: Wikipedia). There can be something different of the same kind. For primary purpose, each person owns one phone number, or take it two. Each number can be mapped to usernames like @bhumish. The second number can have different username like @bhumishgajjar. This mapping can be stored by every ISPs, which can later be combined at higher lever for making it globalized – the same way DNS works till the root servers. For example, my number 91 9090 90909 is mapped to @bhumishg, and so while tipping my number I’ll say ‘My contact number is bhumishg‘. Whenever you dial @bhumishg from your phone, first your ISP will check the mapping and then connect it to me. In the current scenario, our phones remember the things for us, but what if we lessen the burden of our phones too? Just like our twitter handles, we can have unique usernames for the phone numbers. Also, it will be cool having the phone numbers like @h4ck3r or @cutegirl.

Why can’t we have such system?

There can be some issues with setting up such system in the current scenario with increase in technology/devices and the big-data of phone numbers. If it had been early days of the Internet and Mobile phone systems, possibilities of phone DNS could be higher. The number of phone-numbers is increasing at a very fast pace, and the initial setup necessary for these numbers is difficult. Everybody is used to the normal phone-number and name system, and implementing the new (easy) system would be tough for the companies as well as it would be hard to adapt for the users. Plus the infrastructure to be set-up by the ISPs is huge. As ages have passed since the evolution of Internet-DNS and phone numbers, it is now not possible to set it up again.

The idea is great, but the time has passed. Just like IPv6, now we are in need of extending the phone number range also. The ISPs are taking appropriate steps country-wide, but if they can apply some global changes while designing the extended numbers, it would be better.

Here’s an IP: 70.40.203.119, copy-paste it in your browser, enjoy!

WordPress File Hosting Flaw

When an application accepts specific kinds of uploads, it should check them for their validity of being the specific kind only. For example, if you want to allow users upload only .doc files, you should be checking the file thoroughly for being a .doc file only. At basic level, there’s no special programming or resources needed, just match the file signature with its extension.
For example, the file signature for .doc (Microsoft documents file) is “D0 CF 11 E0” (ref: File Signatures on Wikipedia)

WordPress allows users to upload only a limited kinds of files like doc, pdf, gif, jpg. But while uploading, it does not check the file signatures but just the extensions. Hence anybody can upload any kind of file by changing the extension, and WordPress will host it.Wordpress allowed file types
If in case WordPress is restricting files like .exe or .rar to be safe from hosting malwares-virus-trojans, they are doing it wrong. Currently we are not concerned about downloading those any-kind-of-files with valid extensions, but with uploading such files to WordPress blog. If we can upload any kind of file without considering the file signature, it may be possible for the bad-guys to upload anything and lure users to download it anyhow. While in the Insert Media menu, they mention ‘Allowed File Types’, instead they should be mentioning ‘Allowed File extensions’ – as they are checking the extensions only.

If we take the case of GMail, while attaching a file, it checks it thoroughly (kind-of!) so that users can’t attach an .exe file. Even if someone zips the exe, it will catch the steganography and skip attaching the file. But in case of WordPress, you are now aware what happens to file upload. Thus Wikipedia can act as a File-sharing site too (not considering the extensions).

Below is a link of Win32.Polip.A virus, which was a .rar file and I uploaded it by altering the extension to .doc. (Download it at your own risk! This is purely a virus and I am not responsible for any harm.)

Polymorphic File Infector Archived File

Bingo!

(I tried to contact WordPress Support, but I read that I need to post that in forums and I can’t contact the support team directly unless I am a paid-customer. Hence, here I am, making this infomation public.)

And One Hashing utility!

The last time I made a hashing utility, it was in my mind to create a new tool which takes a list of passwords and gives their hash. Now imagine a scenario: you have found out a hash of some common password and now you are in a hurry to get the hashes of words like ‘admin’, ‘root’, ‘admin@123’, ‘passw0rd’, ‘toor’. You can’t take them one by one and find their hash and copy it to a file for matching it with the hash.
Here I present a tiny utility, which will take your words through the command line and create a file with a list of password : matching_hash. Not even just words through command line, you can make a file with the common passwords for future reference – and this utility will give you a new file with the passwords on your file matched with their respective hash.At present it supports just md5 hash function, but the next update (coming soon) will have some other hash functions like sha256 and sha512 and more. Right now the utility takes input as either your words, or a file with the list of those words and gives output as a new file with the words matched with their hashes.

I have uploaded the utility on PyPI, here is the link: wordlisthash.py on PyPI

One More Transposition Cipher

According to Wikipedia, Transposition Cipher is a method of encryption by which the positions held by units of plaintext are shifted according to a regular system, so that the ciphertext constitutes a permutation of the plaintext. That is, the order of the units is changed. Transposition ~ the position of each character is modified according to the key and method used.

The examples of Transposition cipher are Rail Fence, Route cipher, Double Transposition, Myszkowski Transposition. There are some drawbacks associated with some of the transposition ciphers, and the worst is its vulnerability to frequency count. If the ciphertext exhibits a frequency distribution very similar to plaintext, it is mostly a transposition. They can be attacked with anagramming, meaning through sliding pieces of ciphertext and looking for sections that look like anagrams and solving them.

Transposition can be made more secure by combining it with other techniques like substitution cipher. It is also mentioned that Fractionation can enhance the technique, and at last binary technique is mentioned, but there is no considerable work done on the binary side. Yesterday night when I was solving some challenges at my favourite site, it came to my mind about enhancing the transposition techniques by working with binary numbers. When we convert the plaintext to binary, we can have better chances of making the ciphertext more unpredictable through transposition. Here I am presenting the ouline of how to randomize the transposition cipher by using 2 symmetric keys and the hash of plaintext. Hash functions like md5, sha256-512 or whirlpool.

We will need the following:

  • Plaintext
  • Key-1 (alphanumeric)
  • Key-2 (numeric – even length)
  • Hash Function

1. Convert the plaintext(ASCII) to binary.
It can be done with a simple python function. (ref: A stackoverflow post) Here a space is used to differentiate the different ASCII characters, but in real we dont use the space between them.

basic

1(a). Take the Hash of plaintext and store it in a variable.

2. User provides an alphanumeric key, of random length. For example, lets take it of length 10 bits. While, we assume that the plain text is of 20 bits.
3. Make the total length a multiple of 4. The total length here is 20+10 = 30 bits, and we add 2 bits here. Preferrably, in this case we add two ‘1’ bits. Total length = 32.
4. Now the first-last step comes. We have a string of 32 bits, without any spaces. We create a new string / modify our string by placing the bits in this order >> first bit – last bit – second bit – second-last bit – third bit – third-last bit – … … – sixteenth bit – seventeenth bit
This step will kind-of randomize the string.
5. User provides a numeric key of random length. Suppose the key here is 317325.
6. Our string is of 32 bits (a multiple of 4). Hence there can be 8 (= 32/4) groups of bits. Lets name them with numbers, like 1 2 3 4 5 6 7 8.
Transposition is done once again, in a different manner. The key here is 317325. First, we replace ‘3-1’7325.
So in our string, the groups of bits numbered 3 and 1 will be swapped. It becomes
3 2 1 4 5 6 7 8
Again, according to the key, one more swapping of 31’7-3’25. (Here comes a small trick: The 3rd group became the first group, and 1st group is at number 3. So the group at position 7 and at position 3 will be swapped.)
3 2 7 4 5 6 1 8
The last transposition according to the key 3173’2-5’:
3 5 7 4 2 6 1 8
7. The string is randomized. For making it complex, we reverse the first-last step. The new arrangement of bits will be >> first bit – third bit – fifth bit – … … – sixth bit – fourth bit – second bit
The string is again randomized.
8. Now we convert it back to ASCII for some more computation. The hash of the plaintext is available to us.
We take one char of our string, one char of hash, next char from string, next char of hash, … …
Continue the above process till the end of hash, and then keep the characters as-it-is.
Hence, if we consider our string characters as s(1,2,3,4,…) and hash as h(1,2,3,4,…), the new string becomes
s1 h1 s2 h2 s3 h3 … …
The length of hash depends on the Hash function used. For example, if it is md5 then 128 bits, and for whirlpool it is 512 bits.
9. Send the string to the receiver. The receiver knows which hash function was used, and hence can directly take away the bits of hash and save it for verification of plaintext.
10. The reverse process to the above given steps will decrypt the ciphertext.

Why one more transposition cipher?
The well-know ciphers which currently exist do have some or the other flaws, along with that one is common – frequency analysis. In the above given technique, the frequency analysis is nearly impossible. Also, it is much reinforced against anagram attacks.
Why one more transposition cipher in the era of asymmetric-key ciphers?
Take example of emails. People are provided with the public key encryption techniques in their mail-clients, but they seldom use it. Reason is complexity and because they dont like configuring the keys for each user and spending some time decrypting the received message. In the above given technique, the computing is less compared to the public key ciphers, and a one-time setup will work forever. Though user needs to keep changing the keys/hash-functions.
How is it different from the other techniques?
The security. Its sheild against attacks. The cryptanalyst will need to spend more time computing and guessing and playing with the binary data. Although it is vulnerable against brute-force attack, it will need intensive resources as compared to the resources which can crack the traditional transposition ciphers. One more advantage is that this technique can be used for any kind of data – text, video, image. And further this data can be converted to a different kind of data because the encryption is done at bit level. Hence it becomes expensive for the attacker to detect the type of data before doing the cryptanalysis.

I have just started working on the technique, and implementation on real-world scenarios and cryptanalysis through brute-forcing and other techniques are yet to be performed. Here I have just provided my idea on how binary translation can provide better security in transposition ciphers without the intention of criticising any of the prevelant cipher techniques.

Common problems during initial Honeyd configuration

Honeyd is a small daemon for Linux (now also available for Windows) to simulate multiple virtual hosts on a single machine. It is a kind of an interactive honeypot. The latest release can be downloaded from Honeyd release page.

For my project, I have been working with honeypots, and Honeyd is one of them. During the initial stage, I faced some problems while starting the basic setup of some personalities with Honeyd. Here I recall those problems and some misconfigurations which can result in errors (mainly: config file parse error) and can be a problem for first time users.

The command to start honeyd daemon through your terminal is:
# honeyd -d -f honey.conf

Here, honey.conf is my configuration file and -f is used for pointing to that file. -d is used to tell the machine to run honeyd as a daemon.

eth0 not an IP

1

Reason: Your ethernet connection does not have an IP address.

When you are testing on a single machine, the first thing you need to do is give your interface an IP address. The below command will take care of it. Replace ‘eth0’ with your respective interface.

# ifconfig eth0 192.168.1.1
(If you are using a different interface like eth2, you need to mention while starting honeyd. Should be -i <interface>, example -i eth2)

Now, here is my sample configuration file:

2

Lets disect the file line by line.
1: creates a personality, and we will refer to it as windows.
2: name the personality as Windows XP, means someone who is scanning our honeypot will find it so.
3: including the ftp.sh file, which will simulate a FTP server.
4,5,6: opens the tcp ports 135, 139, 445.
7: bind the ip address to our personality.

Try running the honeyd while using our honey.conf file. Error?

parsing configuration file failed

Now, during my initial day I had taken help for the FTP server from a blog on linux.com, “Weekend Project: Use HoneyD to fool attackers“. As it is a tutorial on linux.com, there are more chances that this post will be on top of your Google search for HoneyD on Linux. My point is, they have simplified the process of configuration, explained well, but there is one small error. I have highlighted it in the below screenshot:

3

The error that you will get will be: parsing configuration file failed. It will be on line:3. Set is used for setting our personality to some predefined condition, while add is used to provide something extra. If you are using set for providing preloaded scripts, then surely you will face parsing error.

Solution: replace set with add.
This should be your configuration:

4Now, your honeypot will start its work without any error. Time to rejoice? Kind of.

Logging

How to log any attacks or scans on your honeypot? Use -l <filename>. Normally, it is logged under a directory named honeyd under the /tmp directory. If you dont have that directory, create it with mkdir.
The command I used for logging the attempts was:

5Ah, permission denied!
How to solve this? You guessed right – the file is write-protected, and hence give the write permission to everyone. Use chmod command.
# chmod 766 /tmp/honeyd/log

Can’t detect Ping?

As you’ve seen the configuration file, I have not yet given any MAC address to my honeypot. Hence, it is not yet accessible to the outside world. Try pinging from a different computer, it will fail.
Provide a MAC address to your honeypot with the line as shown in the below screenshot. Check the MAC address of your host machine, and give the address of your honeypot as near as possible to the host address.

6

It is good if you have given the personality name as “Microsoft Windows XP Professional SP1”. If you have given a name like Windows XP (like I have given, in the below screenshot) or Linux Ubuntu 13.10, you are prone to getting an error while parsing the configuration file.

7

8

There are conventions for naming the personalities. There is a list of fingerprints (or names for such personalities) which should be used for naming the honeypot personality. The fingerprints are located in nmap.prints file. It uses the fingerprints which are identified by nmap scan, and hence when someone is scanning the honeypot, they will get the name provided by you.

Locate the nmap.prints file, with locate command. The you can use more to view the whole file, or if you simply want to view the fingerprints, use the grep command as shown in the below screenshot: (ref: Honeyd FAQ)9

You can use any of the personalities in the list displayed by the above command.
While sometimes, there is a need to specify the fingerprint file on the command line. The command should include -p <fingerprint.file>
# honeyd -d -f honey.conf -l /tmp/honeyd/log -p /usr/share/honeyd/nmap.prints

Again, start your honeypot with a new personality.
Ping the honeypot from a remote machine. It will log everything, along with displaying it on the console.
Try doing FTP to your honeypot. It will show you the FTP login screen. (As usual, anonymous login is not allowed!)
Let me know if you face any other problems in configuring your honeypot.

Conclusion: HoneyD is very easy to work with, and hence the choice of many. But some common mistakes like typo or proofreading can bug you till infinity. You mostly need to take care with the initial configuration.
Adios!

A free gift with the dynamic IP

Hellow! One more post for the day.

Until now, I have been using the 3G internet by Tata Docomo. They were generous and gave me IP addresses without any kind of conversion. Means whatever IP I get on my ppp0 interface with ipconfig, is the same IP I get by the Google search ‘whats my ip’. Though they were dynamic IPs, they reached me without any translations.
Last week I switched to a new provider, Vodafone 3G. I don’t know what kind of addressing scheme they are using, but definitely they gave me something more with the IP. Here on my laptop, on the ppp0 interface I have private IP address of 10.119.69.xx, which is further translated by NAT at their side and converted to 1.38.29.123. Mostly we (here ‘we’ refers to the whole group of people whose NAT address is converted to the specified IP, and you can consider the number of people in a class-A scheme) are given that IP address on the outside, while the inside address keeps changing.
Now, whats the problem with that IP? Because, Spamhaus has black-listed that IP. Here’s the link: Spamhaus haz my IP black-listed. Reason? Before some days/months/years, that IP was a member of Cutwail spambot and kept sending spam mails. My first reaction on reading this was – let me check if I am affected with that spyware/bot. Additionally, there are some cons of getting black-listed by the Spamhaus >> online services (like port-scans, some forums) will block you, and the main problem will be with the SMTP.
Two things need to be done:
Spamhaus should have kind-of dynamic listing
Else ISPs should be taking actions for getting the IP out of Spamhaus’ black-list.

Will be soon contacting my ISP for further discussions on the issue.

PS – I’m safe. 🙂 No cutwail here.

simplyhash.py

After developing a tiny game of Rock Paper Scissors Lizard Spock based on python, during the free time today I made a module for getting the hash of a user provided string. This hash function makes use of the built-in ‘hashlib’ in Python, and provides options for using any of the hash function among md5 (128 bits), sha1 (160 bits), sha256 (256 bits) and sha512 (512 bits). It is kind of interactive, and can take any of the two inputs – either a file or a string. Unless specified, the program continues to give the hash through the chosen function.

I am willing to add more hash functions (like RIPEMD, md6, whirlpool) in the next update. Plus, thoughts of some encryption mixology module are in progress.
Have uploaded the hash-er module here: simplyhash.py on PyPI

Phishtank

Phishtank is a project by OpenDNS community. OpenDNS is a company which provides its services for safe and fast browsing to the Internet. While Phishtank is a community where anyone can share or check phishing data.
Phishtank is not a technology to filter phishing/spam or to protect against phishing attacks, but a platform to submit, verify, check or share phishing details so it provides as a repository of phishing data.

How to support Phishtank?
You can support Phishtank in either ways-

  • If you come across a website or an URL which you think is a phishing attempt, report it to Phishtank.
    How to report?

    1. By adding a Phish URL on the Phishtank website.
    2. By forwarding the phish email Phishtank.
  • If you are a lucky guy and don’t come across much phishes, you can support Phishtank by verifying phishes. Whenever you are having some free time, jump to verify a phish. There will be a list of latest phish links submitted by users like us, which need to be verified by users (like us) in order to validate them as valid or invalid phishes.

What happens after we submit or verify a phish?By the users’ reviews, phishtank knows that a link is a valid phish or not. If it is a valid phish, it stores it in its repository, or else it discards the data after some time.
Through that repository, either by Is it a Phish button or by their APIs, people can verify whether a given link is a phish or not, without getting their hands dirty by visiting the link. When the link is verified as a valid phish, OpenDNS takes appropriate action to eliminate that address and thus making the web more secure against Phishing attempts.
On Phishtank, anyone can check or search for active phishing sites in the Phish Archive. It is the repository of phishes submitted by users, and showing whether the phish is valid/invalid and online/offiline. Phishtank also provides nice statistics of total submissions, suspected phishes, graphs for phish verification and submission.

Whenever you are having some free time, do some work at Phishtank for making our Internet a better and safer place.

A device for scents?

There are great moments – we have birthday parties, weddings, or any memorable moment on a normal day. To cherish these moments, we capture them visually as photographs and videos. Even after years, these moments excite us, bringing back the memories and feelings.
Now, even some aromas have the same effect. Some scents make us nostalgic. The smell of a particular food, miles away from our home can bring the memories of mom’s food. While some smells simulate us in other way. I always had a feeling that if we can store these scents with us in any form and retrieve them back when we want to smell them, that would be great. Once I had a soap, which had a very nice aroma but I had only one piece of the soap. So I wished that the soap never gets finished (because of the aroma).
Speaking of today’s markets, for visuals – we have cameras, for our voices – we have recorders, but for scents? There is a vast scope for some devices or products which can deal with scents for storing and giving back the smell whenever we want to have it.

A Python exercise on Codecademy

print “Hello World!”

These days I was busy with college work and exams. I learnt Python some months back, and found it very interesting to work with. My sources of learning Py were Head First Python (O’Reilly) and Beginning Python (Wiley Publishing), plus some online tutorials. While my first and favourite source was Python exercises on CodeAcademy. Hence, afterwards I made an exercise on that website for playing Rock Paper Scissors. You know that the coding of such program is too easy, but the backside validation for the user inputs was much tricky. Willing to make some more exercises at an advanced level. The Rock Paper Scissors exercise, after some beta testing by the website peeps, is available here: Rock Paper Scissors on Codecademy

Snort on Debian

Snort, is an Intrusion Detection and Prevention System for Windows and *nix machines. You can download it from here: Snort Download.

Well, for debian we dont require to download it from there. The command to download and install it is-

# apt-get install snort

This will download and install Snort to your Debian.

Next step is to configure the Snort for generating alerts for any activity.  For example, we can consider ICMP-ping requests for alerts. Whenever someone pings our machine, an alert will be logged.

For configuration, 3 directories are necessary. If they are not created on their own, create them with mkdir command. They are:

/etc/snort

/etc/snort/rules

/var/log/snort

Now, our configuration file is: /etc/snort/snort.conf

If you need, you can take a backup of the original file, and then create a new file and edit it as below:

include /etc/snort/rules/icmp.rules

We don’t need to add other lines, as right now we are considered about only the ICMP requests, we will configure only the icmp.rules file and hence it is referenced in the snort.conf  file.

Now, the icmp.rules file contains the below content:

alert icmp any any -> any any (msg:”Hey, someone pinged!”; sid:477; rev:3;)

This line will log any ICMP request from any source, with the given message. The sid and rev are used to uniquely identify Snort rules and its revisions.

Now, to start Snort listening on interface eth1, the command will be:

snort -c /etc/snort/snort.conf -l /var/log/snort -i eth1

The first location is where the Snort configuration file is located, while the second location with -l is where to store the alert, and -i provides the interface selection.

Now, ping the machine from some other machine, and you will find an entry in the alert file located in /var/log/snort. It will contain the source and destination IP addresses, the time and date of the incident and other information related to the query.

Similarly, you can configure Snort to generate alerts on various incidents like FTP login, SSH attempts, Telnet requests.

Snort Configuration for ICMP